Wednesday, January 26, 2011

Exercise 2.9 - Rhythms and Patterns

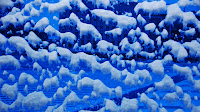
For this exercise I had to make two shots: one representing patterns concept and the other - rhythms. For this I decided to use the same object, but from different angles. It was a blue window of a bus stop in the center of Tallinn. I liked the color and the transparency of the window as well as the natural pattern on the window created by the snow.

1. Pattern. I guess that this picture fully covers the concept of pattern. It looks obvious here that the sequence of the snow patterns continues beyond the frame. Though the pieces of show different shapes and sizes, all together they form a pattern on the window.

30mm f.4.0 1/100sec

2. Rhythm. Here I have take a picture of the same object. But additional details make it work as a rhythmic image. Metal bars in the top create an optical bit. Both sequence of snow patterns and and metal bars, leading to the end of the corridor make an eye follow the direction and finally find a way out of the corridor that is difficult to notice when you first look at the picture.  

38mm f.4.5 1/200sec

When starting this exercise, it was a bit difficult to understand, what is actually meant by rhythm in terms of photography. I did not have this problem with pattern shot, as it is pretty straightforward . However, as soon as I took the picture of the corridor between the glass and the wall, I got it at once, as I really felt, how my eyes were moving all the way along the blue wall and reach the final point at the end of the corridor. A had not also paid attention before to the optical beat question. This task made me think of the picture more in a way one usually thinks of music...

Tuesday, January 25, 2011

Exercise 2.8 - Real and Implied Triangles

In this exercise I had to take six pictures with real or implied triangles on them.

1. Subject that itself is a triangle. That was the easiest part of the exercise, because I have immediately noticed an advertising on a trash bin with a green triangle logo on it.


  2. The second shot was to illustrate the triangle converging towards the top of the frame. It is a church roof, you may find a lot of them in the medieval cities. This shot probably needed some more cropping to stress the triangle, but I did not want to cut out the dark tree in front of the church, which I think, adds up to the composition.


3. The other version of triangle - converging towards the bottom of the frame. Again, it might be worth cropping this shot so that lantern would fill the whole frame, but I liked the blurred detail on the background in the right bottom corner.  


4. As a second part of the exercise I had to work with still life objects. Here is the one with apex at the top. The apex here is a bit out of focus, it might be worth using aperture smaller than at f3.2.


5. The same objects but with apex in the bottom. I don't think this composition works well enough here. 


6. The last bit of the exercise was a triangle made by three people. I have chosen three aikido sportsmen in different poses an on different distances. All together they form a triangle.

    
 When taking pictures the one might have implied triangle in the composition just accidentally, like in case of aikido sportsmen on the last picture. They add dynamism to the composition and put all the parts of the composition in the invisible order. It is also worth noticing the implied triangles when taking pictures of landscapes, in order to avoid static nature on the shots.

Sunday, January 16, 2011

Exercise 2.7 - Implied Lines

This exercise consisted of three parts.

The first part implied analyzing the pictures from the course material. I had to find implied lines on two different shots. Here they are:

1. On the first shot one line above the horse is rather showing their movement direction. The other line, eye-line, is showing contact with a person on the picture.


2. On the second shot I found three implied lines, all referring to the movement of the bull.


The second part of the exercise was to analyze three own pictures and fid implied lines on them:

1. On the first picture I found an implied line connecting two brightest points of the shot. The other line is creating a bigger diagonal that goes through the whole frame. The third line is showing the direction of movement.


2. On the second shot I have found only one line, which is an extension of the main object, pointing to the city.


 3. On the third picture I have found two lines, pointing to the direction of the movement.


The third part of the exercise was to take two shots with different implied lines:

1.The line on this shot represents the extension of a line, adding up to the slight shadow behind the wind surfer.


2. The second shot is an eye-line. Here I decided to have some fun and made a composition of a mouse and an elephant. The mouse is clearly looking at the big animal suspiciously. It was quite difficult to make a composition, where the implied line would be seen. I had to experiment with different exposures and finally decided that the best shot was at f.3.5 and 1 second shutter speed. I wanted to have both the mouse and elephant in focus, and tried to experiment with very long exposures. But I realized that by having everything in focus I sacrifice the depth of the field, and main objects became too flat.


The implied lines is a very subjective, though interesting thing, when preparing a composition. It makes photographer think about the objects within the frame more thoroughly.  

Exercise 2.6 - Curves

The task was to take four pictures, where curve would create a sense of movement or direction. I decided to take all four shots outside, using different nature and city objects.

1. On this shot curve is more showing direction of tree, the way it has been bended by the snow.


2. Here the whole composition says for itself. The road turning left together with a sign and snow.


3. Here the curve is showing both the movement and the direction of the water current.


4. It seemed interesting to me, how curve puts such a static object as buildings into quite a dynamic composition.  


Summarizing this exercise, I would say, that in most cases people use curves even without thinking, what they are actually adding to the composition. I guess that thinking more thoroughly in temrs of curves, diagonals and lines really improves the vision of the composition.

Sunday, January 9, 2011

Exercise 2.5 - Diagonals

This task, as well as the previous, was also related to the lines.
Here are the four different pictures that have a diagonal line as a main part of the composition.

1. The first shot was stairs that create a diagonal from upper left corner of the frame to the bottom right corner.


2. The second shot is a lantern with three rows of wires, that represent three diagonal lines. The lamp itself is also a diagonal. Here is also the problem of too sensitive ISO 1600, which creates a lot of noise. Also, the background could be more plain, because trees behind the wires are a bit distracting.  


3. Though the horizon is horizontal, the shadow from the trees and the ski run show two obvious diagonals. And by cropping everything that was distracting the attention from them, I think I managed to create a 'diagonal' shot.


4. This picture I like the most, because of the composition and a big number of diagonals created naturally by the objects within the frame. This picture I have taken with a wide angle lens Tokina f.4 12-24mm. Out of four shots taken for this exercise, I like this one the most.

Exercise 2.4 - Horizontal and Vertical Lines

The task was to take pictures of the horizontal and vertical lines. I decided to shoot both outside and inside objects for this and used my Tamron f2.8 90mm for inside macro objects and Tamron f3.5-6.3 18-250mm for outside objects.

Here are the horizontal ones:

1. This was a first object that came to my mind when thinking of horizontal lines. Because I wanted this shot to be evenly sharp, I used aperture of f.20 and a bit longer shutter speed of 1.3 sec. It might be that cropping more to the level of a single line would make this picture more interesting, but I decided to leave it as it is.


2. Another inside object that I decided to picture was a set of magazines on the shelf. Due to the lighting conditions, the shutter speed here was very long - 15 sec and again, to make the wording on the top magazine visible, I used a quite small aperture of f.18.


3. For outside objects I went to the railway station. The snow,  old trains standing on a distance and the rails together created a set of lines. The mistake that I have made here was leaving ISO at 1600, though there was no real reason for this. I have just forgotten to change the setting back. That's why, I converted the image into black and white, to make the amount of noise a bit more justified.  


4. As it was not see from the distance, I zoomed the train to the longest focal distance of 250mm, where lines of snow complemented each other, creating a set or lines.


Vertical lines:

1. The curtain here creates an impression of straight vertical lines. The lights on the background are just for making composition more interesting. Again, here is the the same mistake with ISO 1600. If it was set up in a right way, there would be less noise on this shot.


2. Probably not the best object for lines exercise, but still the shape of the building, corners contrasting with shadows and some background might qualify as a set lines.


3. The windows of these building are in a form of lines. Shooting from a sharp angle stresses the aim of this composition.


 4. The pattern on this old door says for itself. The strange lock just adds up to the composition.


Monday, January 3, 2011

Exercise 2.3 - Multiple Points

For this exercise I decided to go back to one of my previous attempts and following the advice of the the tutor take a picture of the small compact objects on the mirror, so that the mirror edges would not be seen in the frame.

As a background I have take some lights, part of the window and the reflection of a cup in the mirror. The candies themselves are the main objects reflected in the mirror. So, starting from a single object and further increasing the number of candies up to eight a ended up with quite a big number of shots. Then I have chosen 6 of them, as described in the task. Here they  are:


This time I have also experimented with a shutter speed to create different kinds of background. As can be seen, the background lights are smaller on the first three pictures, than on the other three. I have also a bit experimented with colors balance in these pictures, as can been seen from different tones of the colors on the background.


And finalizing this exercise, here is the final picture with the biggest number of points and I have shown by arrows the shape of the composition. It looks like  trapezium with a biggest point in the middle. I am still in doubt, whether this composition really works or not...